Name server refers specifically to a server that hosts DNS zone files. When an end-user visits a domain name, the DNS lookup first checks the name servers provided by the domain, which indicate which server to check for the specific DNS records for that domain.
Most domain name registrars will set up their name servers for your domain name. Therefore, you must change it to the name servers of your web server.
Steps to change your name servers of your domain name
Before change your name servers, you need to know your web hosting name servers. You can find them in the following ways:
- In your welcome email. The welcome email which was sent when you signed up for web hosting will contain the name servers listed for your hosting account. These name servers can be used on all sites that are hosted on your web hosting account.
- In Account Information or Hosting Information section of your hosting control panel.
- You can get the name servers list after you setup a new VPS.
- If you still can’t find this information, you should contact your hosting provider.
How to change the name servers will depend on the hosting provider's control panel, but it is the same.
- Go to your Domain Manager
- Look for a control such as Name Servers or NameServers,... in your domain manager control panel.
- Select Use Custom Nameservers or Change Nameservers
- Enter your name server, sush as
ns1.your-domain.comns2.your-domain.com - Wait for your name server to be updated. It may take from 1 hour to 48 hours.
If you have any questions, contact the domain registrar and let them know that you would like to register private name servers for your domain.
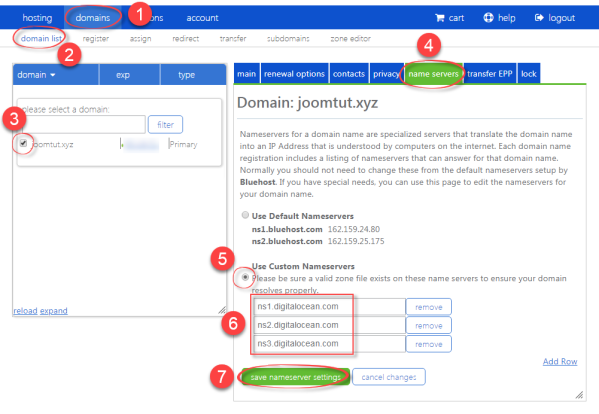
Here are the steps to change the name server at Bluehost
1 Login to your Bluehost account then go to Domain Manager
2 Select Domain list
3 Select your domain name
4 Go to Nameservers or Name Servers section
5 Select Use Custom Nameservers
6 Enter the nameserver of your web server. The nameserver look like: ns1.domain.com, ns2.domain.com, ns3.domain.com
7 Save your setting.
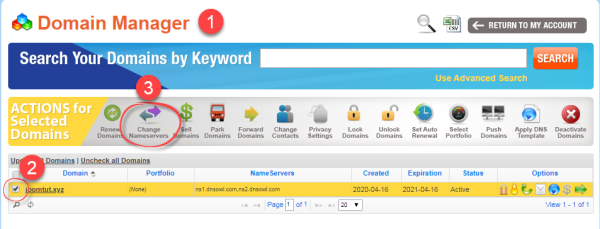
Here are the steps to change the name server at NameSilo
1 Login to your NameSilo account then go to Domain Manager
2 Select your domain name
3 Click Change Nameservers
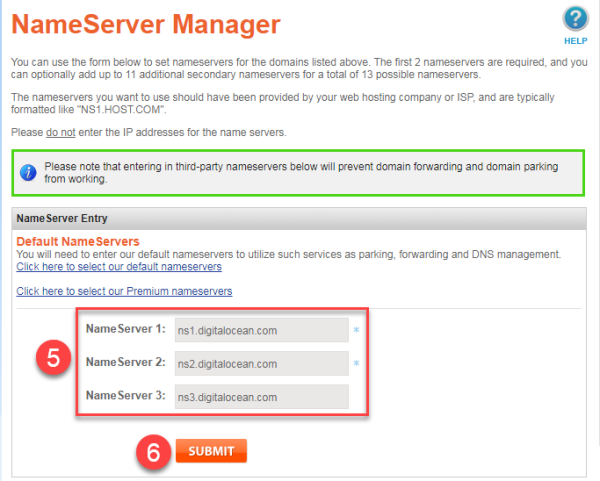
4 Enter your name servers. The name servers look like: ns1.domain.com, ns2.domain.com, ns3.domain.com
5 Click Submit to save your setting.
If your hosting provider gives you three name servers, but your registrar only allows you to enter two, use the first two name servers.
You have to wait for the domain name server to update the changes, it can take from 1 hour to 48 hours.


