In Joomla!, Menus and Menu Items provide the overall structure for the site. One Menu normally contains multiple Menu Items. Each Menu Item loads a pre-defined type of page determined by the Menu Item Type.
Adding a new menu item in Joomla! 1.5
- Log in to the Joomla! back-end.
- If needed, create a Menu using the Menu Manager. Read more about: How to create a Menu in Joomla! 1.5?
- Open the Menu Item Manager in one of the following ways:
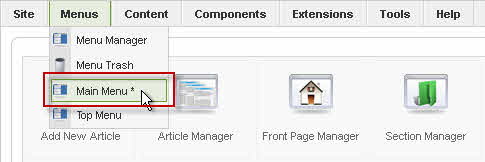
- Select the Menu you wish to add an item to from the Menus drop-down menu.
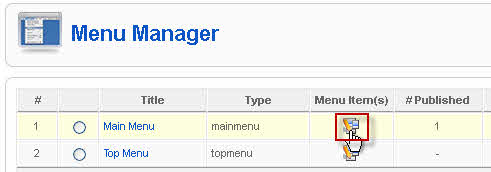
- From the Menu Manager, click the Edit Menu Item(s) icon for the desired Menu.
- In the Menu Item Manager, click the New toolbar button to open the Menu Item: New screen.

- Select the appropriate menu item type. For example to insert a single Article select Internal Link -> Articles -> Article Layout.
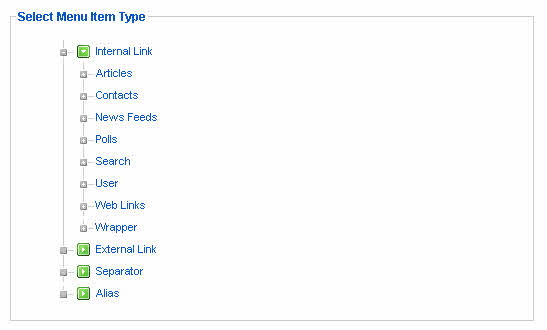
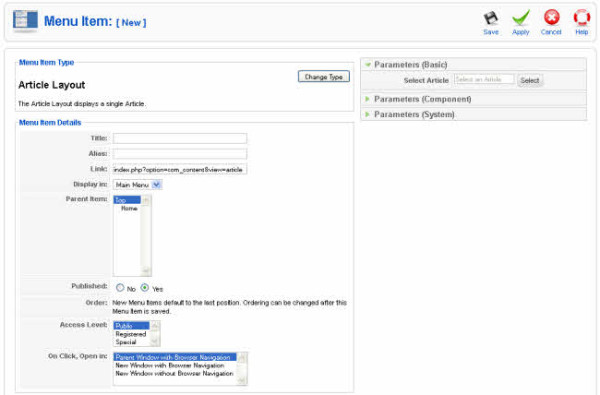
- Complete the Menu Item Details section as required. Each Menu Item Type will have it's own parameters to complete as well as common parameters and Menu Item Details.
Menu Item Details
- Title. The Title for this item. This may or may not display on the page, depending on the parameter values you choose.
- Alias. The internal name of the item. Normally, you can leave this blank and Joomla! will fill in a default value. The default value is the Title or Name in lower case and with dashes instead of spaces. You may enter the Alias manually. The Alias should consist of lowercase letters and hyphens (-). No blank spaces or underscores are allowed. The Alias will be used in the URL when SEF is activated. Note: If the title consists of non-Latin characters, the Alias will default to the current date and time, for example "2010-02-11-17-54-38".
- Link. The internal link to the web page. Joomla! fills this in for you. No entry is allowed.
- Display in. Menu where this Menu Item will display. Normally, no entry is needed, since this defaults to the current Menu. However, this may be changed to any Menu using the drop-down list box. Note that if you change this to a different menu, when you press Save you will be returned to the Menu Item Manager for the new parent Menu.
- Parent Item. Used to determine whether a Menu Item is a top-level item or a submenu item. Select Top (the default value) if this is a top-level Menu Item. Otherwise, select the Menu Item that is this item's parent.
- Published. Whether or not this item is published. Select Yes or No from the radio button group to set the Published state for this item.
- Order. Indicates the order of this Menu Item in the Menu. The default Order is to add the Menu Item to the end of the Menu. This Menu Item will moved to the order position just after the Menu Item selected from the drop-down list. Note that the Order of Menu Items can also be changed in the Menu Item Manager.
- Access Level. Who has access to this item. Current options are:
- Public: Everyone has access
- Registered: Only registered users have access
- Special: Only users with author status or higher have access
Enter the desired level using the drop-down list box.
- On Click, Open in. Controls whether the page is opened in the Parent Window with Browser Navigation, in a New Window with Browser Navigation, or in a New Window without Browser Navigation. For Menu Items that reference pages inside your web site, you will mostly use the first option, which is the default. Links to external web pages normally use one of the New Window options so the user can see the external link without leaving your site.
Parameters - System
- Page Title. Optional entry for Page Title. The Page Title displays in the title area of browser window. If this is left blank, the Menu Title is used. If the Show Page Title parameter is set to Yes, this title also displays as the title of the page.
- Show Page Title. Whether or not to display the Page Title. If this is set to Yes, then a Page Title will display on the page above the first Article. The title that displays will either be the Page Title set in Parameters - System above, if entered, or the Menu Item Title (if the Page Title is blank). Note that this does not work on the Article, Section Table, and Category Table layouts.
- Page Class Suffix. Optional entry. Allows you to enter a CSS class suffix that will be attached to all classes of this page. This allows you to create customized CSS styles that will apply just to selected pages. You would then modify the template.css file of your template to apply styling to this new class.
- Enter this parameter with a leading space to create a new CSS class for each element. Enter the parameter without a leading space to change the CSS class name for each element.
- See the tutorial Using Class Suffixes in Joomla! 1.5 for more information.
- Menu Image. Optional image to display to the left or right of the Menu Item. Image must be in the folder images/stories.
- SSL Enabled. Whether or not this page should use SSL (Secure Sockets Layer) and the Secure Site URL. This is used to encrypt the information sent between the browser and the web site.
The Menu Item Details and the Parameters - System parts are the same for each Menu Item. The Parameters - Component part is different for each Internal Link group - Articles, Contacts, News Feeds, Polls, Search, User, Web Links, and Wrapper.
The Parameters - Basic section is different for each Menu Type. Also, some Menu Types contain a Parameters - Advanced section, which is also different for each Menu Type.

