Joomla! 1.5 is an award-winning content management system (CMS), which enables you to build Web sites and powerful online applications. Many aspects, including its ease-of-use and extensibility, have made Joomla the most popular Web site software available. Best of all, Joomla is an open source solution that is freely available to everyone.
Preparing to install Joomla! on localhost
Why install Joomla! on localhost?
- Because you may need to install something else or settings parameters and test your website before you publish it online.
- To install Joomla on localhost, you first need to install the Web server on your computer.
Read more about Localhost or Remote Host Installations
Read more about What is Localhost? How to create web server on localhost?
Download Joomla! 1.5
- You can download latest release of Joomla! 1.5.x at: https://downloads.joomla.org/cms
- Select the latest package file type suitable for your system. If you don't know, please select the .ZIP file.
- Save the installation package file to the folder on your computer.
Copy Joomla! installation files to your web folder
- Create a sub folder in the web root folder for the Joomla! installation. It's a web folder. In this tutorial we will create a folder named joomla.
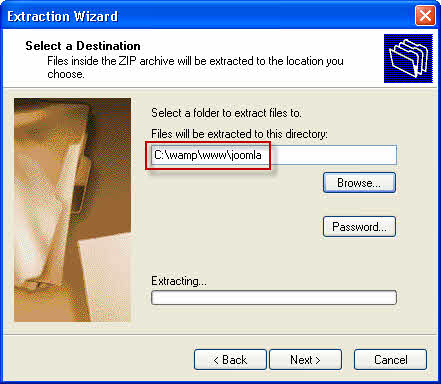
- Unzip the installation package file to your web folder. For example C:\wamp\www\Joomla
- The files are now in the right place and you are ready to install Joomla!

Install Joomla! on localhost
- Open the Joomla! site in your browser. If you called the folder for the Joomla! files joomla, then enter the URL in your browser: http://localhost/joomla (If you called the file something else - then use the name of that file instead of joomla.
- The Joomla! Installation screen displays. Here you are stepped through seven choices in order to set up the site, the database and a few other things. Your progress is indicated to the left of the screen.
Step 1. Select the language and press the Next button. This is the installation language not the content language,
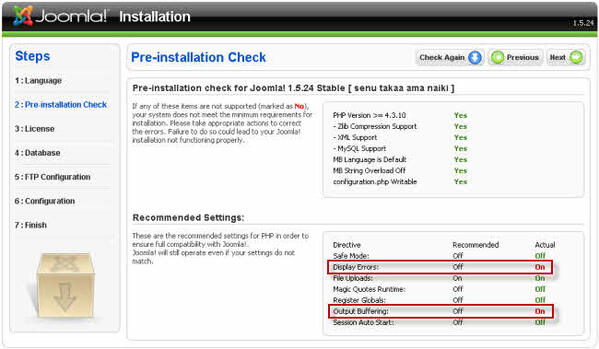
Step 2. Look at the Pre-installation check.
- There should not be any red items, apart from Display Errors, which can read On. If the parameters of PHP is not compatible (with red text), you can see how to fix them here: How to change PHP settings compatibility with Joomla! on localhost?. When you're done, click the Check Again button to check and then press Next to continue.
Step 3. Read the GNU General Public License page and press Next.
Step 4. The database configuration page. This sets up and configures the database, where all the content for the site is stored. Enter the details into the form:
- Leave database Type as mysql
- Host name is localhost
- User Name is root
- Enter the MySQL password. This must already exist for the database you are going to use. Localhost will not have a password (leave it blank)
- Database name - this is the name of this instance of Joomla! - in the example here use joomla. If you used a different name - use that here for the database name.
- Press Next when all the entries are done.
Step 5. Skip the FTP configuration - so press Next.
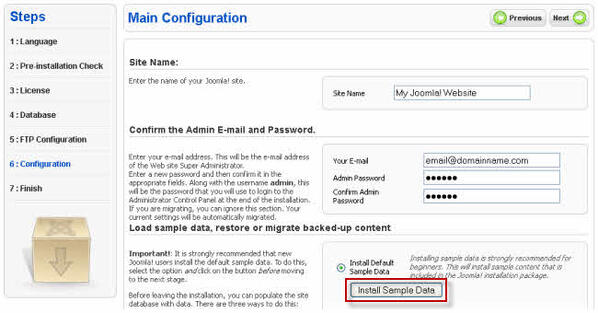
Step 6. Site name and sample data.
In the form:
- Give it a name - such as 'My Joomla! Website'.
- Enter an email address.
- Enter a password - and remember this as it lets you use the site!
The sample data:
- There is some information on the side panel about why you should install the sample data.
Why install the sample data?
- It is a useful resource
- It is helpful in showing how a Joomla! site hangs together.
- You can edit articles
- You can observe different ways of doing things.
- It is used in this series of documents
- If you want both a site with sample data and a site with no data - you can install another instance of Joomla! on the same computer.
- Click the button that says - Install Sample Data. The button will then read 'Sample data installed successfully'. It is slightly confusing as you might expect it to take longer.
- Press Next to continue when all is done
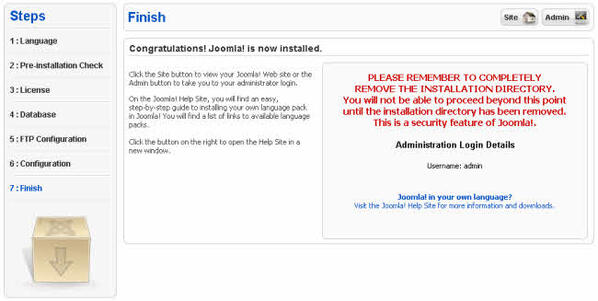
Step 7. The Finish screen has helpful advice.
- You need to do one more thing - remove the installation directory. In this example it is at: C:\wamp\www\joomla\installation
- If you try to go on to use the site without doing this, you will be prompted to do it. You are only allowed to continue when it has been deleted.
To use the site and the administration pages
- There are separate web addresses for the main Site and for the administrator Back-end Assuming the site is joomla: The site (also known as the Front-end) is http://localhost/joomla/
- The administration page - (known also as the Back-end) is http://localhost/joomla/administrator
- If you have used a different name - put that in instead of joomla.


